Category: Uncategorized

  • Custom Hi-Vis Rain Jackets and ANSI/ISEA 107: Which Class You Actually Need

    Custom Hi-Vis Rain Jackets and ANSI/ISEA 107: Which Class You Actually Need

    A hi-vis rain jacket is one of the hardest garments in safety apparel to get right, because it has to do two jobs that actively work against each other. It has to keep water out, which pushes a designer toward sealed seams, coated fabrics, storm flaps and darker contrast panels that hide grime. And it has to stay visible under ANSI/ISEA 107, which wants the largest possible area of glowing fluorescent fabric and unbroken bands of reflective tape. Get the balance wrong and you end up with a jacket that is genuinely waterproof but no longer certifiable, or one that passes on paper but leaks at the shoulders after a season. This guide walks through how the standard actually applies to rainwear, the numbers you can check yourself, and the places where a custom logo can quietly cost you the rating you paid for.

    Waterproofing and visibility pull in opposite directions

    Ordinary hi-vis is a single layer of knit or woven polyester. Rainwear adds a waterproof coating or laminate, taped seams, a hood, and usually a longer cut. Every one of those additions competes for the same real estate the standard wants covered in fluorescent fabric and reflective tape. Hoods and storm flaps interrupt the horizontal reflective bands that make a moving worker readable at distance. Two-tone designs with a black or navy lower body — popular because they hide road grime — subtract from the fluorescent area the standard counts. And the seam tape that keeps water out can physically overlap the reflective trim if the pattern was not planned around it. None of this is a reason to avoid waterproof hi-vis; it is a reason to treat the rain jacket as a compliance problem first and a comfort problem second.

    The ANSI/ISEA 107 classes, in numbers you can check

    ANSI/ISEA 107-2020 sorts garments by Type and Class. Type O is off-road, for controlled settings like warehouses and yards. Type R is roadway, for anyone exposed to public vehicle traffic. Type P is public safety, cut shorter so first responders can reach a duty belt. The Class number — 1, 2, or 3 — sets how much certified material the finished garment must carry, and the standard states those minimums as fixed areas rather than vague guidance.

    For a Type R Class 2 garment, the finished piece needs at least 775 square inches of fluorescent background fabric and 201 square inches of retroreflective material. Step up to Type R Class 3 and the minimums jump to 1,240 square inches of background and 310 square inches of reflective — which is why a true Class 3 must have sleeves and reflective bands on the arms, not just the torso. Type O Class 1 sits far lower at 217 and 155 square inches. The public-safety Type P numbers are lower than roadway because those garments are deliberately shorter. The chart below lays the minimums side by side so you can see how steeply the requirement climbs.
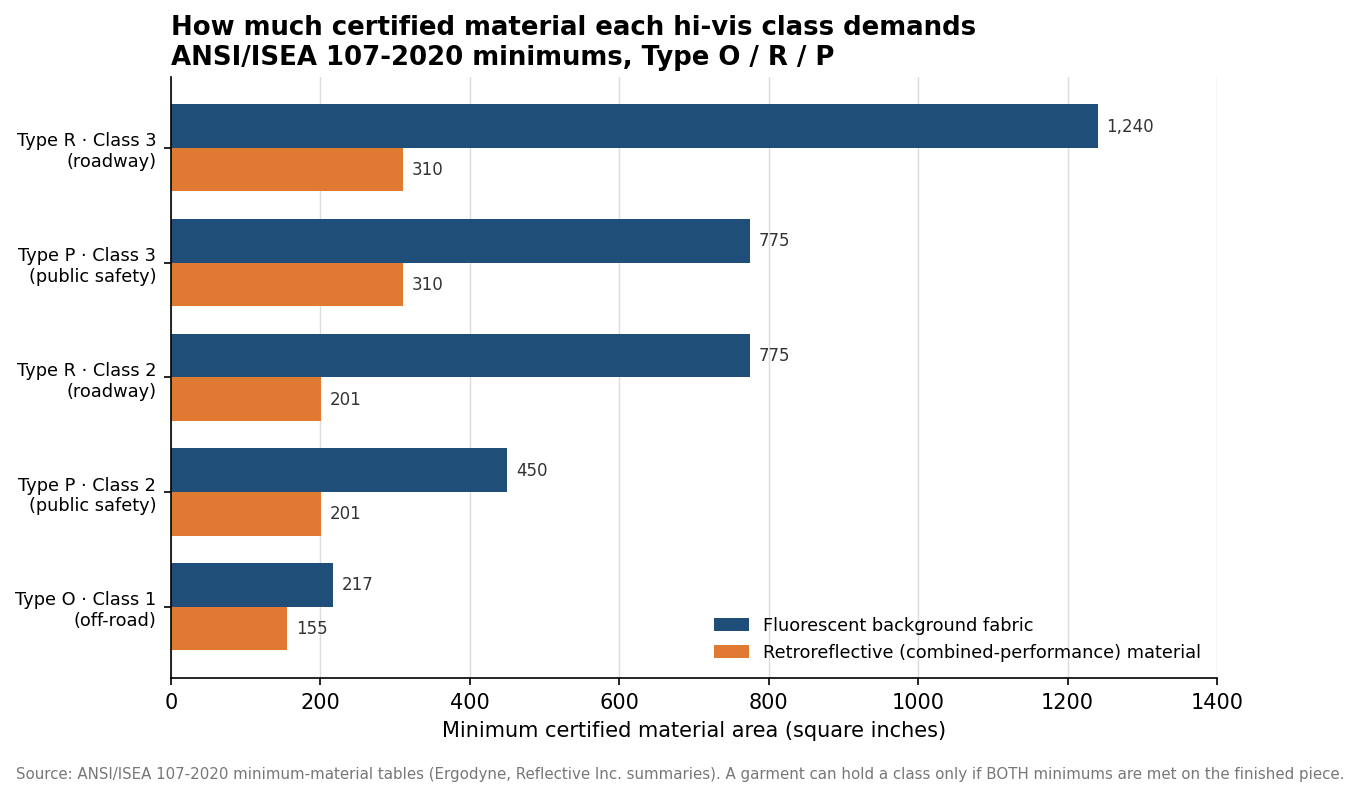
    Grouped horizontal bar chart of ANSI/ISEA 107-2020 minimum background and retroreflective material area in square inches for each garment type and class
    Minimum certified material climbs steeply from Class 1 to Class 3; a garment holds a class only when the finished piece meets both minimums.

    The practical takeaway is that a class lives on the finished garment, not on the roll of fabric. A mill can sell you certified hi-vis oxford all day, but if the cut jacket does not carry enough of it in the right places, it is not a Class 3 jacket. This matters because federal rules — the FHWA worker-visibility rule under 23 CFR Part 634 — require anyone working within the right-of-way of a federal-aid highway to wear apparel meeting ANSI/ISEA 107, in practice Class 2 or Class 3. The class on the label is what an inspector reads.

    What “waterproof and compliant” asks of the fabric

    Most hi-vis rain shells are built from polyurethane-coated polyester oxford, commonly in the 150 to 300 denier range. The oxford weave carries the fluorescent dye and takes the coating well; the PU layer on the back is what actually stops water. Lighter deniers pack down smaller and breathe a little better; heavier ones survive abrasion against ladders, scaffolding and truck beds. Waterproofing only holds if the seams are sealed — look for heat-taped or welded seams rather than plain stitched ones, because every needle hole in a coated fabric is a leak path. A jacket described as “water resistant” rather than “waterproof with taped seams” will wet through at the shoulders and hood in sustained rain.

    The reflective material has its own rules. On rainwear it should be heat-sealed to the outer waterproof shell, not sewn to an inner liner, so that it stays visible and does not perforate the membrane. Reflective bands are typically 2-inch (50 mm) combined-performance tape, and the standard limits horizontal gaps in the reflective material to no more than 2 inches, with bands kept clear of the very bottom hem. Segmented (broken-pattern) tape is allowed and flexes better in the cold, but it has to meet the same minimum area once you add up the reflective squares. When you compare quotes, confirm the tape is combined-performance certified and not a decorative silver trim that merely looks the part.

    Where a custom logo quietly breaks the rating

    This is where a print-and-embroidery decision collides with the standard. Every square inch of logo placed over fluorescent fabric is a square inch that no longer counts toward the background minimum. A large screen-printed back panel or a wide chest block can pull a borderline Class 2 jacket under its threshold, and a logo positioned across a reflective band interrupts the continuity the standard requires. The fix is not to skip branding — it is to reserve logo zones before the garment is cut, size the jacket so the minimums are met with the branding already in place, and keep decoration off the reflective tape entirely.

    Decoration method matters just as much on a waterproof shell. Embroidery drives a needle through the coated fabric hundreds of times, and on a rain jacket that means hundreds of potential leak points unless the back of the stitching is sealed or backed. For that reason heat-applied transfers or printed patches are usually the safer route on waterproof rainwear, with embroidery reserved for unlined or lower-priority areas. If a supplier offers to embroider a large logo directly onto a taped-seam shell without addressing the perforation, treat that as a red flag for the jacket’s waterproofing.

    Pricing, and how to spec an order that passes

    Indicative single-unit retail pricing gives you a sense of the bands before customization enters the picture. A Class 2 hi-vis rain jacket commonly lands in the low tens of dollars, a Class 3 jacket runs higher because it carries more certified material, a two-piece Class 3 rain suit costs more again, and an insulated Class 3 parka sits at the top. The chart below shows those ranges; treat them as illustrative rather than quotes, because case quantity, decoration method and fabric weight all move the final number.
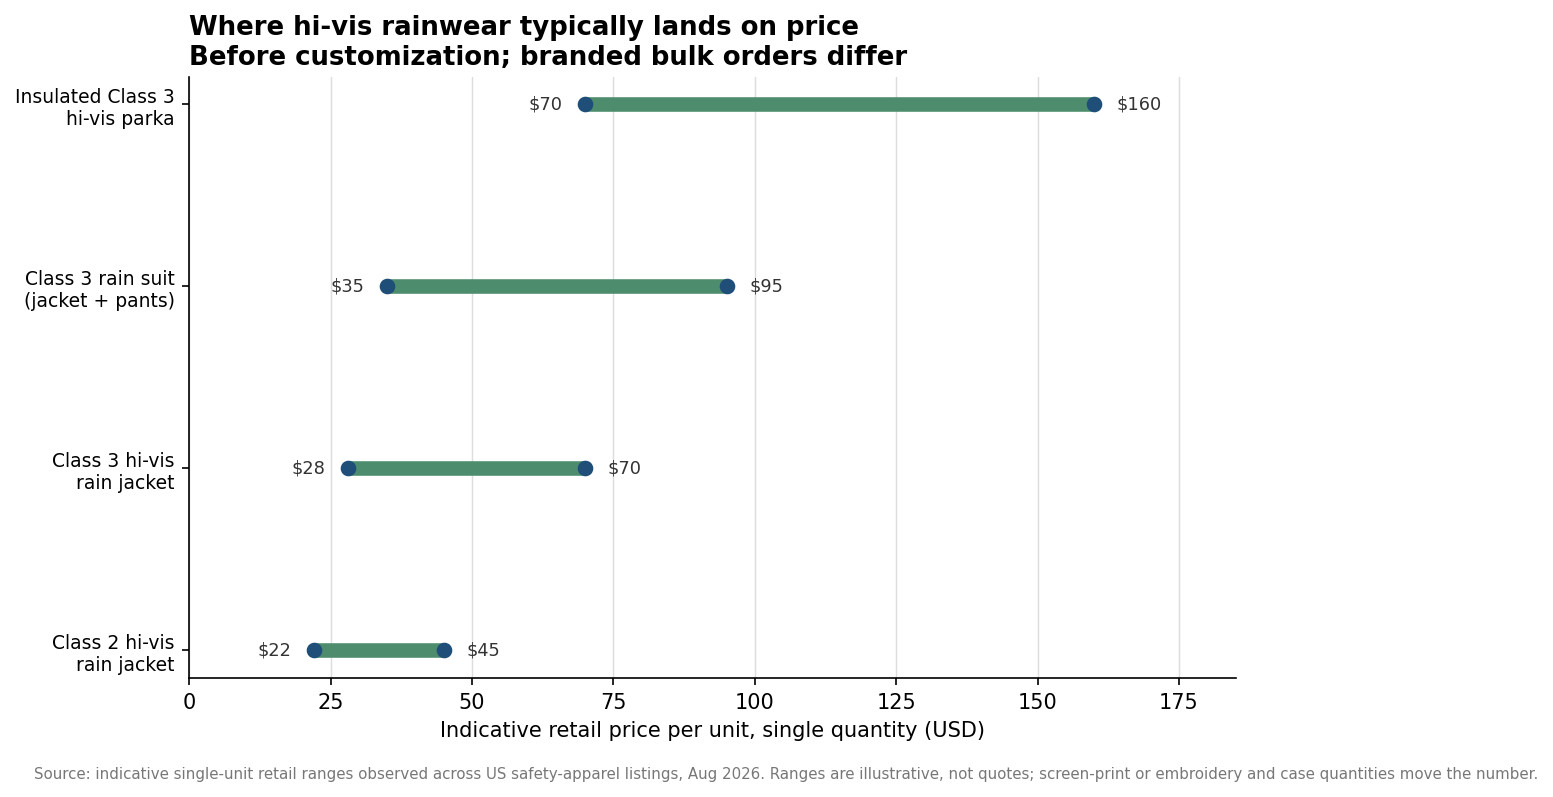
    Range chart of indicative single-unit retail price bands for Class 2 and Class 3 hi-vis rain jackets, rain suits, and insulated parkas
    Indicative retail price bands for hi-vis rainwear before customization; branded bulk orders move these figures.

    To spec an order that actually passes, name the Type and Class up front — “Type R, Class 3” — rather than asking for “hi-vis rainwear” and hoping. Ask for the certificate of conformity or test report for the finished garment, not just the fabric. Confirm the seams are taped or welded and the reflective is combined-performance tape heat-sealed to the shell. Reserve your logo placement so branding does not eat into the background or cross the reflective bands, and choose your fluorescent color — yellow-green reads best in most daylight, orange-red often wins against green foliage or equipment. Finally, size up when in doubt: coverage is measured on the garment a worker is actually wearing, and a jacket that just squeaks past Class 3 on a small can slip under it once you scale the pattern down. Spend the extra minutes at the specification stage and the jacket will keep both the rain and the auditor off your crew.
  • Waterproof and Breathability Ratings for Custom Rain Jackets, Decoded

    Waterproof and Breathability Ratings for Custom Rain Jackets, Decoded

    The spec sheet on a rain jacket comes down to two numbers and a short list of construction terms. When you are ordering custom jackets in quantity for a crew, an event, or your own shelves, reading those numbers correctly is the difference between gear people actually reach for when it is pouring and a stack of jackets that get left in the car. Here is what the ratings mean and how to match them to the job.

    The waterproof number: hydrostatic head

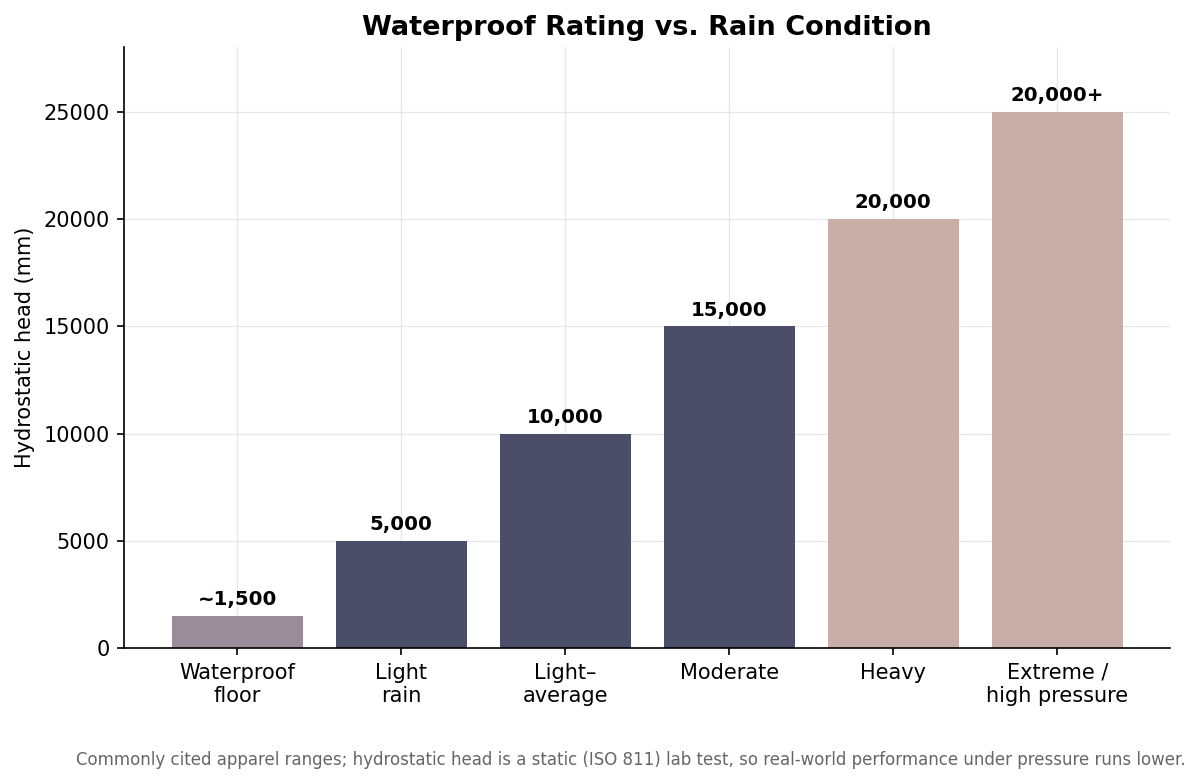
    Hydrostatic head is the headline waterproof figure, measured in millimeters. The test seals fabric under a column of water and records how tall that column gets before water is forced through, so a higher number means the fabric resists more pressure before it leaks. As a rough industry map, around 1,500mm is the common floor for a fabric to be called waterproof at all; roughly 5,000mm handles light rain, 10,000mm light-to-average rain, 15,000mm moderate rain, and 20,000mm and up covers heavy rain and higher pressure.

    Bar chart of waterproof hydrostatic head ratings in millimeters mapped to rain conditions
    Roughly how hydrostatic head ratings map to rain conditions, from the waterproof floor to extreme exposure.

    The important caveat is that this is a static laboratory measurement. Real weather adds dynamic pressure, driving rain, a backpack strap pressing on your shoulders, the simple act of kneeling or sitting on a wet surface, and under that pressure the effective waterproofing runs lower than the lab figure suggests. The practical move is to buy a margin above the minimum for the conditions rather than ordering right at the edge.

    The comfort number: breathability

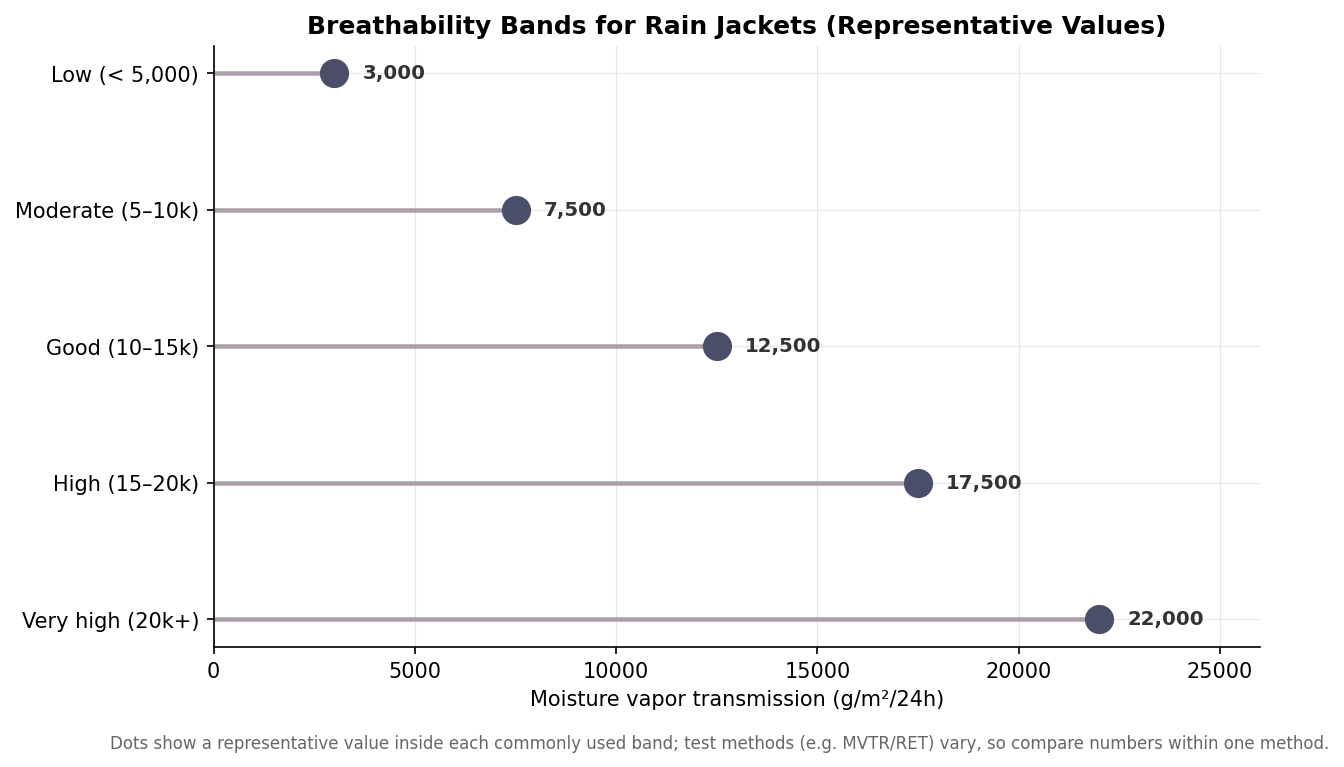
    Waterproofing keeps rain out; breathability lets your own sweat vapor get out, and it is measured as moisture vapor transmission in grams per square meter over twenty-four hours. Higher numbers move more vapor. Commonly used bands put anything under about 5,000 in the low range, 5,000 to 10,000 as moderate, 10,000 to 15,000 as good, 15,000 to 20,000 as high, and 20,000 and above as very high.

    Dot plot of rain jacket breathability bands in grams per square meter per 24 hours
    Breathability bands in grams of vapor per square meter per 24 hours, low through very high.

    Breathability is the spec people forget and then complain about. A cheap non-breathable shell keeps the rain off and traps sweat against the body, so the wearer feels clammy within minutes and blames the jacket. For anyone active in the jacket, event staff on their feet all day, warehouse and yard crews, anyone hiking or working outdoors, breathability matters as much as the waterproof rating. For a jacket that mostly lives in a bag for the occasional shower, you can weigh it less.

    How the jacket is actually built

    Fabric becomes waterproof in one of two broad ways. A coating, typically polyurethane, is applied to the inside of the face fabric; it is inexpensive and reliable but generally less breathable. A membrane is a thin laminated film with microscopic structure that blocks liquid water while letting vapor pass; it costs more and breathes better. On top of either sits a durable water repellent (DWR) finish, a surface treatment that makes water bead and roll off the outer face. DWR is not permanent, it wears away with abrasion and washing, and it is restored with a wash-in or spray-on reproofer, which is worth telling recipients so their jackets keep performing.

    Then there are the seams, which is where water-resistant and truly waterproof jackets part ways. Every stitched seam is a line of needle holes, and on a water-resistant jacket those holes let water wick straight through even when the fabric itself does not fail. A waterproof jacket seals them, either with heat-applied seam tape over the stitching or with welded seams that bond the panels without a needle at all. When a jacket is marketed as water-resistant rather than waterproof, unsealed seams are usually the reason.

    Matching the rating to the use

    Overbuying wastes budget and overweights the jacket; underbuying leaves people wet. For a giveaway or occasional-use jacket, a lightweight packable shell in the 5,000mm range with taped seams sheds showers, packs small, and carries a logo well. For staff who are outdoors through a full shift, step up to roughly 10,000 to 15,000mm with genuine breathability so they stay dry without cooking. For sustained, harsh exposure, utilities work, marine settings, ski operations, look for 20,000mm and up with welded seams. A 25,000mm mountaineering-grade shell is simply wasted money as a company-picnic giveaway, and a 3,000mm novelty jacket is a false economy for a road crew.

    Fit belongs in the same decision. A jacket meant to layer over a hoodie or a hi-vis vest needs to be cut generously enough to close over that bulk, so for a team order it is worth requesting a size run of samples and letting people try them on before you lock quantities. Ordering a full curve from small through the largest sizes your group actually needs, rather than defaulting to a wall of mediums, is what keeps the finished jackets in rotation instead of in a drawer.

    What to confirm before you order

    Before committing to a run, ask the supplier for the hydrostatic head figure in millimeters rather than the word waterproof alone, and ask whether the seams are untaped, taped, or welded, since that single detail separates a jacket that holds up from one that leaks at the shoulders. If the jackets are for active wear, ask for the breathability number too. Confirm whether the fabric carries a DWR finish and how it is reproofed. Above all, get one physical sample and run a simple spray test before you approve hundreds of units; a five-minute test on the actual fabric tells you more than any line on a spec sheet. The figures here are typical industry ranges rather than fixed guarantees, and test methods differ between mills, so compare numbers that were measured the same way and verify the specifics with your supplier.

  • Why Branded Rainwear Outlasts Every Other Giveaway

    Call or Text us: (929) 605-4397
    Business

    Why Branded Rainwear Outlasts Every Other Giveaway

    It survives the drawer

    Most promotional products are used for a week and thrown out. A rain jacket is kept for years, and it is worn in public on precisely the days people are paying attention to what they own.

    Weather creates the impressions for you

    Nobody wears a branded jacket to be seen in it. They wear it because it is raining. That means the impressions arrive without any effort on your part, in public, repeatedly, for as long as the jacket lasts — which for a decent shell is several years.

    Quality is the whole strategy

    A cheap jacket that leaks is worse than no jacket, because your logo is on the thing that failed. This is the one category where under-specifying actively damages the brand you are trying to promote. Buy fewer, better ones.

    Packable beats impressive

    For giveaways specifically, the jacket that folds into its own pocket beats the more expensive one that does not. It lives in a backpack permanently, so it is present on the day the weather turns. A better jacket left at home generates zero impressions.

    Specify it properly

    Taped seams if it will be worn for work, packable if it is a gift, and branding heat-sealed or on a backed panel either way. Send your sizes and artwork and we will quote the exact specification. Minimum order is 12 jackets, production runs 2 weeks, and your free mockup arrives within 24 hours.

    Create your custom rain jackets now.

    Send your logo, quantity and date — you’ll get a free mockup and quote within one business day.

    Get a Quote
    GET A QUOTE
  • Custom Rain Jackets: A Buyer’s Guide

    Call or Text us: (929) 605-4397
    Buyer’s guide

    Custom Rain Jackets: A Buyer’s Guide

    Start with time outdoors, not with budget

    Most branded rainwear is bought on price and colour, then abandoned on a hook. The jackets that get worn are the ones matched to how long the wearer is actually outside.

    Ten minutes between a car and a building is a completely different specification from eight hours on a site. The first is a packable shell. The second is a taped-seam waterproof, and nothing cheaper will survive the season.

    Waterproof and water-resistant are not the same word

    The difference shows up at the stitching. Every seam is a line of needle holes, so a jacket with a waterproof face fabric and untaped seams will wet through at the shoulders within an hour of steady rain. If the wearer is out all day, taped seams are not an upgrade, they are the product.

    Breathability is why jackets get taken off

    A sealed shell that keeps rain out also keeps sweat in. For anyone moving hard, or anyone who will come indoors and stay in the jacket, a breathable softshell gets worn far more than a superior waterproof that feels clammy after twenty minutes.

    Put the branding where it cannot leak

    Embroidery punches holes through fabric. On a waterproof shell that matters, which is why the logo belongs on a backed panel or heat-sealed rather than stitched straight through the membrane. Any supplier who has not thought about this has not made much rainwear.

    What to expect when you order

    Send your sizes and whatever artwork you have. You will get a free mockup within 24 hours, unlimited free revisions, and you pay nothing until you approve it. Minimum order is 12 jackets and production runs 2 weeks, with faster turnaround available on express shipping.

    Create your custom rain jackets now.

    Send your logo, quantity and date — you’ll get a free mockup and quote within one business day.

    Get a Quote
    GET A QUOTE
  • Taped Seams vs Water Resistant: Where Rainwear Actually Fails

    Call or Text us: (929) 605-4397
    Specs

    Taped Seams vs Water Resistant: Where Rainwear Actually Fails

    The failure point is the stitching, not the fabric

    Nearly every complaint about a rain jacket traces back to one detail that is invisible from the outside and never mentioned on the label.

    Why the seams leak first

    Sewing a jacket means perforating the fabric thousands of times. The face fabric can be completely waterproof and the jacket will still wet through along the shoulder and sleeve seams, because water follows the needle holes. Taping seals those holes from the inside with a bonded strip.

    How to tell in thirty seconds

    Turn the jacket inside out and look along the shoulders. Taped seams show a smooth ribbon of bonded tape running over the stitching. If you can see bare thread, it is water resistant, whatever the tag says.

    When water resistant is genuinely the right choice

    Short exposure, high activity, or indoor-outdoor wear. A breathable water-repellent softshell is more comfortable and gets worn more often than a sealed shell that nobody wants to keep on. Specifying the heaviest option everywhere is its own kind of mistake.

    What we would specify

    Taped seams for anyone outdoors more than an hour at a stretch. Softshell for offices, clubhouses and client-facing teams. Minimum order is 12 jackets, production runs 2 weeks, and the mockup is free within 24 hours.

    Create your custom rain jackets now.

    Send your logo, quantity and date — you’ll get a free mockup and quote within one business day.

    Get a Quote
    GET A QUOTE
  • Custom Rain Jackets With a Logo: How to Decorate Without Ruining the Waterproofing

    Custom Rain Jackets With a Logo: How to Decorate Without Ruining the Waterproofing

    A logo can quietly ruin a rain jacket. The shell you chose may hold out a downpour perfectly well until a decorator puts a stitched crest on the chest and punches a few thousand needle holes straight through the waterproof layer. Ordering custom rain jackets with a logo is really two decisions stacked on top of each other: how waterproof the garment needs to be, and how you put your branding on it without undoing that waterproofing. Get the order of those decisions right and the rest is straightforward.

    Start with the waterproof rating, not the color

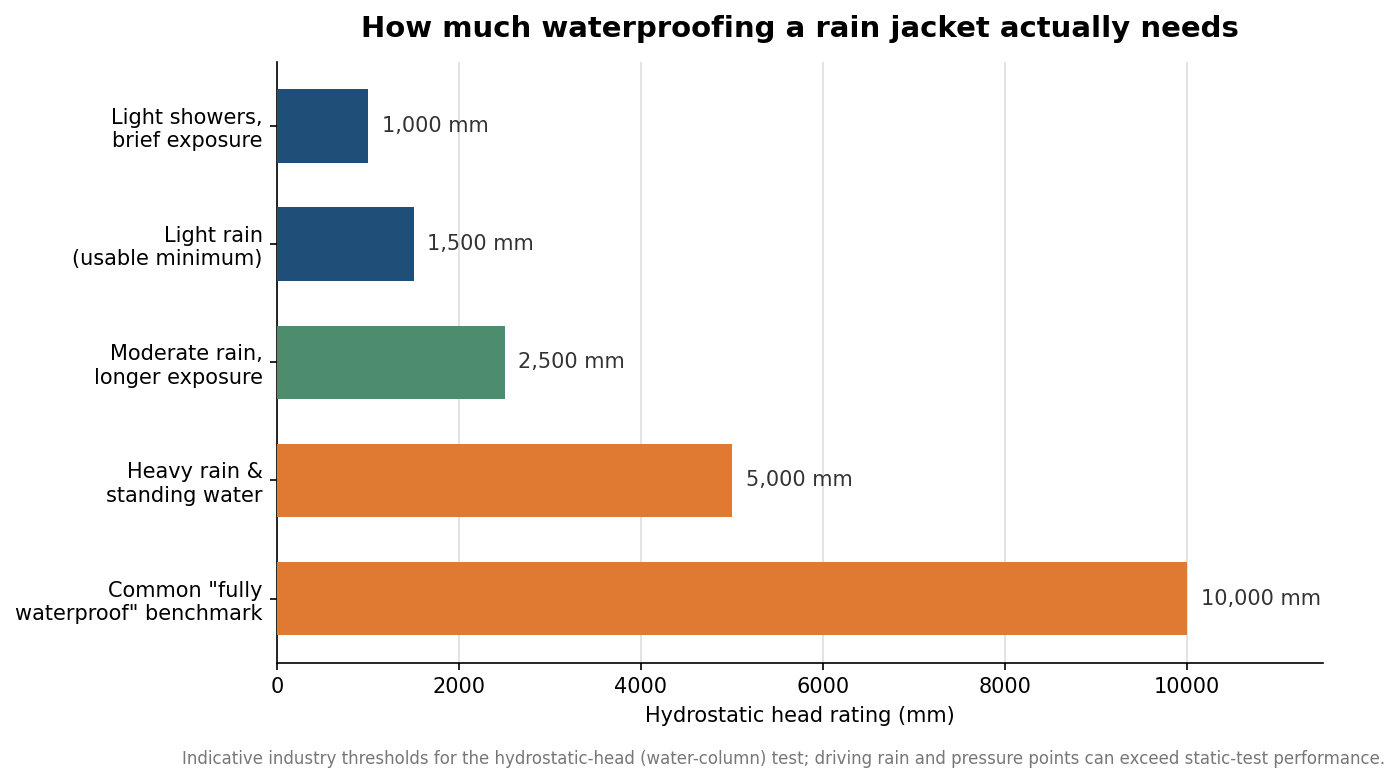
    The number that matters most rarely appears on the product photo. Waterproofing is measured as hydrostatic head: the height of a water column, in millimeters, that a fabric can hold back before it starts to leak. As a rough industry guide, around 1,500 mm is the usable minimum to call a fabric waterproof for light rain. Ratings in the 2,000 to 3,000 mm band handle moderate rain and longer exposure, and 5,000 mm and above is where you get into genuinely heavy rain and standing water. Many outdoor shells are built to a 10,000 mm benchmark, which is comfortably more than a logo’d event jacket usually needs.

    Match the rating to the job. A jacket handed out at a one-afternoon 5K does not need the same wall of protection as gear your grounds crew wears through a wet season. Two caveats are worth stating plainly: the hydrostatic-head test measures resistance to static pressure, so driving rain and pressure points like shoulders under a backpack strap can leak sooner than the lab number suggests; and very high waterproof ratings can trade away breathability, leaving you clammy from the inside even while staying dry from the outside.

    Horizontal bar chart of hydrostatic head waterproof ratings in millimeters by rain condition, from 1,000 mm for light showers to a 10,000 mm fully-waterproof benchmark
    Waterproofing is measured in millimeters of hydrostatic head; match the rating to how wet the job really gets.

    Breathability is the companion spec, usually written as grams of water vapor passing through a square meter of fabric in 24 hours. Higher numbers move more sweat out. If people will be active in the jackets, a breathable membrane or vents matter as much as the waterproof rating; if the jacket is mostly for standing around in a drizzle, you can prioritize a lower price and a higher waterproof number instead.

    Why embroidery and waterproofing fight each other

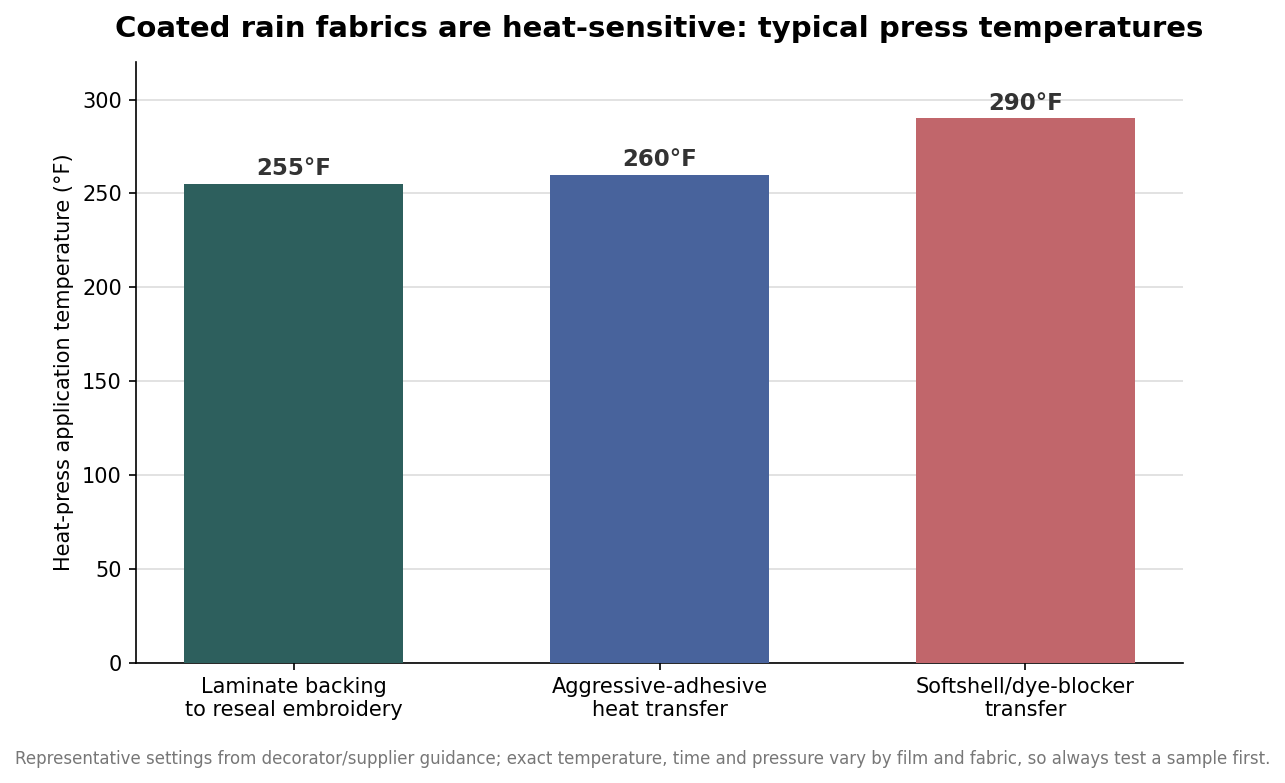
    Embroidery looks premium, and on a fleece or a soft-shell it is a great choice. On a true waterproof shell it is a compromise, because stitching concentrates thousands of tiny needle holes into a small area and each one is a potential leak path through the coating or membrane. That does not make embroidery impossible, but it does mean the decorator has to do extra work. The common fix is to seal the back of the stitched area with a laminate film applied with heat, roughly 255°F for around fifteen seconds, so the interior side is closed back up. A small left-chest logo is far more forgiving than a large stitched back panel, simply because there is less perforated area to reseal.

    If keeping the waterproof rating fully intact is the priority, the safer path is a decoration method that sits on the surface rather than punching through it. That is where heat-applied transfers and, in some cases, screen printing come in.

    Heat transfer and screen printing on coated shells

    Coated rain fabrics are heat-sensitive, which is the detail that trips up shops used to decorating cotton tees. The face of the fabric can scorch, gloss over, or discolor if the press is too hot or dwells too long, so temperature control is the whole game. Heat transfers succeed on nylon and polyester shells when the transfer uses an aggressive hot-melt adhesive built to grip coated surfaces; typical press temperatures land around 260°F, with dye-blocking softshell transfers running hotter, near 290°F, to stop the garment’s color from bleeding into the print. Screen printing is possible but fussier: the fabric can discolor during the flash-cure between colors, and plain inks may not bond to slick nylon without a catalyst or a two-part ink formulated for the substrate.

    Bar chart of heat-press application temperatures for decorating coated rain fabrics: laminate backing 255 degrees, heat transfer 260 degrees, softshell dye-blocker transfer 290 degrees Fahrenheit
    Coated rain fabrics scorch easily, so decoration methods rely on carefully controlled press temperatures.

    The practical takeaway is to test before you commit. A reputable decorator will run a sample on the exact jacket you plan to order and confirm that the adhesive holds, the color stays true, and the waterproofing survives. Woven or rubberized patches are a fourth option worth asking about; a heat-sealed patch can carry a detailed logo while limiting how much of the shell gets perforated or pressed.

    Fabric, seams, and the details that decide comfort

    Most branded rain jackets are built from a polyester or nylon shell with a polyurethane (PU) or thermoplastic polyurethane (TPU) coating on the inside and a durable water repellent (DWR) finish on the face that makes rain bead up and roll off. The DWR wears down with use and washing and can be revived with a spray-on or wash-in treatment, which is worth mentioning to anyone who expects the jacket to last several seasons. The other detail that separates a jacket that keeps you dry from one that merely looks like it will is seam sealing: fully taped seams cover the needle holes left by construction stitching, while untaped seams can wick water even when the fabric itself is rated well.

    Weight and packability are the comfort levers. A lightweight packable nylon shell folds into its own pocket and suits giveaways and travel, while a heavier three-layer shell feels more durable and less like a plastic bag but costs more and ships bulkier. Fit runs large when jackets are meant to layer over a hoodie or uniform, so confirm whether you want a trim retail cut or a roomier team fit before you lock in sizes.

    Quantities, lead times, and budgeting

    Custom outerwear behaves differently from custom tees on minimums and price. Embroidery and heat-transfer setups often run at low minimums, sometimes a dozen pieces or fewer, while multi-color screen printing usually wants a larger run to justify the screen setup. Services advertising “no minimum” exist, but the per-unit price climbs steeply at ones and twos because the setup cost is spread across fewer jackets. As an indicative range rather than a quote, blank waterproof jackets commonly sit in the tens of dollars each, and a decorated logo rain jacket often lands anywhere from the low-$30s to $90 or more depending on the fabric, the features like taped seams and vents, the decoration method, and the quantity.

    Lead times typically run about one to three weeks for a standard decorated order once artwork is approved, with rush options available at a premium; plan for longer if a specific jacket model has to be sourced or if you need pre-production samples. When you brief a supplier, give them four things up front: the waterproof rating you need, the decoration method and logo placement, the quantity and size breakdown, and your in-hand date. Those four answers let a decorator tell you immediately whether your logo choice and your waterproofing goal can coexist, or whether one of them needs to bend.

    Branding a rain jacket is not hard, but it rewards deciding in the right order: pick the protection level the job actually calls for, then choose a decoration method that respects it. Do that, and you end up with jackets that carry your name and still do the one thing a rain jacket is bought to do.

  • Hello world!

    Welcome to WordPress. This is your first post. Edit or delete it, then start writing!