A hi-vis rain jacket is one of the hardest garments in safety apparel to get right, because it has to do two jobs that actively work against each other. It has to keep water out, which pushes a designer toward sealed seams, coated fabrics, storm flaps and darker contrast panels that hide grime. And it has to stay visible under ANSI/ISEA 107, which wants the largest possible area of glowing fluorescent fabric and unbroken bands of reflective tape. Get the balance wrong and you end up with a jacket that is genuinely waterproof but no longer certifiable, or one that passes on paper but leaks at the shoulders after a season. This guide walks through how the standard actually applies to rainwear, the numbers you can check yourself, and the places where a custom logo can quietly cost you the rating you paid for.
Waterproofing and visibility pull in opposite directions
Ordinary hi-vis is a single layer of knit or woven polyester. Rainwear adds a waterproof coating or laminate, taped seams, a hood, and usually a longer cut. Every one of those additions competes for the same real estate the standard wants covered in fluorescent fabric and reflective tape. Hoods and storm flaps interrupt the horizontal reflective bands that make a moving worker readable at distance. Two-tone designs with a black or navy lower body — popular because they hide road grime — subtract from the fluorescent area the standard counts. And the seam tape that keeps water out can physically overlap the reflective trim if the pattern was not planned around it. None of this is a reason to avoid waterproof hi-vis; it is a reason to treat the rain jacket as a compliance problem first and a comfort problem second.
The ANSI/ISEA 107 classes, in numbers you can check
ANSI/ISEA 107-2020 sorts garments by Type and Class. Type O is off-road, for controlled settings like warehouses and yards. Type R is roadway, for anyone exposed to public vehicle traffic. Type P is public safety, cut shorter so first responders can reach a duty belt. The Class number — 1, 2, or 3 — sets how much certified material the finished garment must carry, and the standard states those minimums as fixed areas rather than vague guidance.
For a Type R Class 2 garment, the finished piece needs at least 775 square inches of fluorescent background fabric and 201 square inches of retroreflective material. Step up to Type R Class 3 and the minimums jump to 1,240 square inches of background and 310 square inches of reflective — which is why a true Class 3 must have sleeves and reflective bands on the arms, not just the torso. Type O Class 1 sits far lower at 217 and 155 square inches. The public-safety Type P numbers are lower than roadway because those garments are deliberately shorter. The chart below lays the minimums side by side so you can see how steeply the requirement climbs.
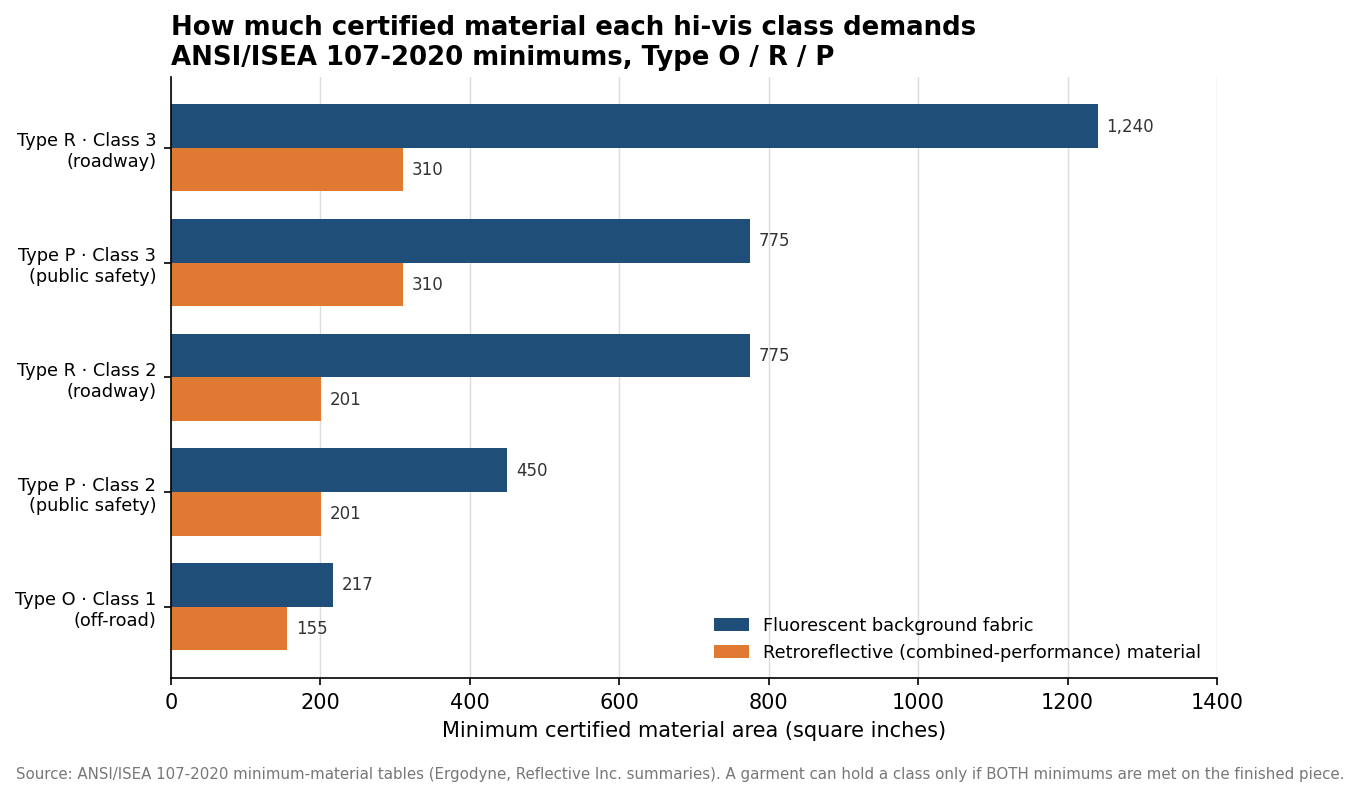
The practical takeaway is that a class lives on the finished garment, not on the roll of fabric. A mill can sell you certified hi-vis oxford all day, but if the cut jacket does not carry enough of it in the right places, it is not a Class 3 jacket. This matters because federal rules — the FHWA worker-visibility rule under 23 CFR Part 634 — require anyone working within the right-of-way of a federal-aid highway to wear apparel meeting ANSI/ISEA 107, in practice Class 2 or Class 3. The class on the label is what an inspector reads.
What “waterproof and compliant” asks of the fabric
Most hi-vis rain shells are built from polyurethane-coated polyester oxford, commonly in the 150 to 300 denier range. The oxford weave carries the fluorescent dye and takes the coating well; the PU layer on the back is what actually stops water. Lighter deniers pack down smaller and breathe a little better; heavier ones survive abrasion against ladders, scaffolding and truck beds. Waterproofing only holds if the seams are sealed — look for heat-taped or welded seams rather than plain stitched ones, because every needle hole in a coated fabric is a leak path. A jacket described as “water resistant” rather than “waterproof with taped seams” will wet through at the shoulders and hood in sustained rain.
The reflective material has its own rules. On rainwear it should be heat-sealed to the outer waterproof shell, not sewn to an inner liner, so that it stays visible and does not perforate the membrane. Reflective bands are typically 2-inch (50 mm) combined-performance tape, and the standard limits horizontal gaps in the reflective material to no more than 2 inches, with bands kept clear of the very bottom hem. Segmented (broken-pattern) tape is allowed and flexes better in the cold, but it has to meet the same minimum area once you add up the reflective squares. When you compare quotes, confirm the tape is combined-performance certified and not a decorative silver trim that merely looks the part.
Where a custom logo quietly breaks the rating
This is where a print-and-embroidery decision collides with the standard. Every square inch of logo placed over fluorescent fabric is a square inch that no longer counts toward the background minimum. A large screen-printed back panel or a wide chest block can pull a borderline Class 2 jacket under its threshold, and a logo positioned across a reflective band interrupts the continuity the standard requires. The fix is not to skip branding — it is to reserve logo zones before the garment is cut, size the jacket so the minimums are met with the branding already in place, and keep decoration off the reflective tape entirely.
Decoration method matters just as much on a waterproof shell. Embroidery drives a needle through the coated fabric hundreds of times, and on a rain jacket that means hundreds of potential leak points unless the back of the stitching is sealed or backed. For that reason heat-applied transfers or printed patches are usually the safer route on waterproof rainwear, with embroidery reserved for unlined or lower-priority areas. If a supplier offers to embroider a large logo directly onto a taped-seam shell without addressing the perforation, treat that as a red flag for the jacket’s waterproofing.
Pricing, and how to spec an order that passes
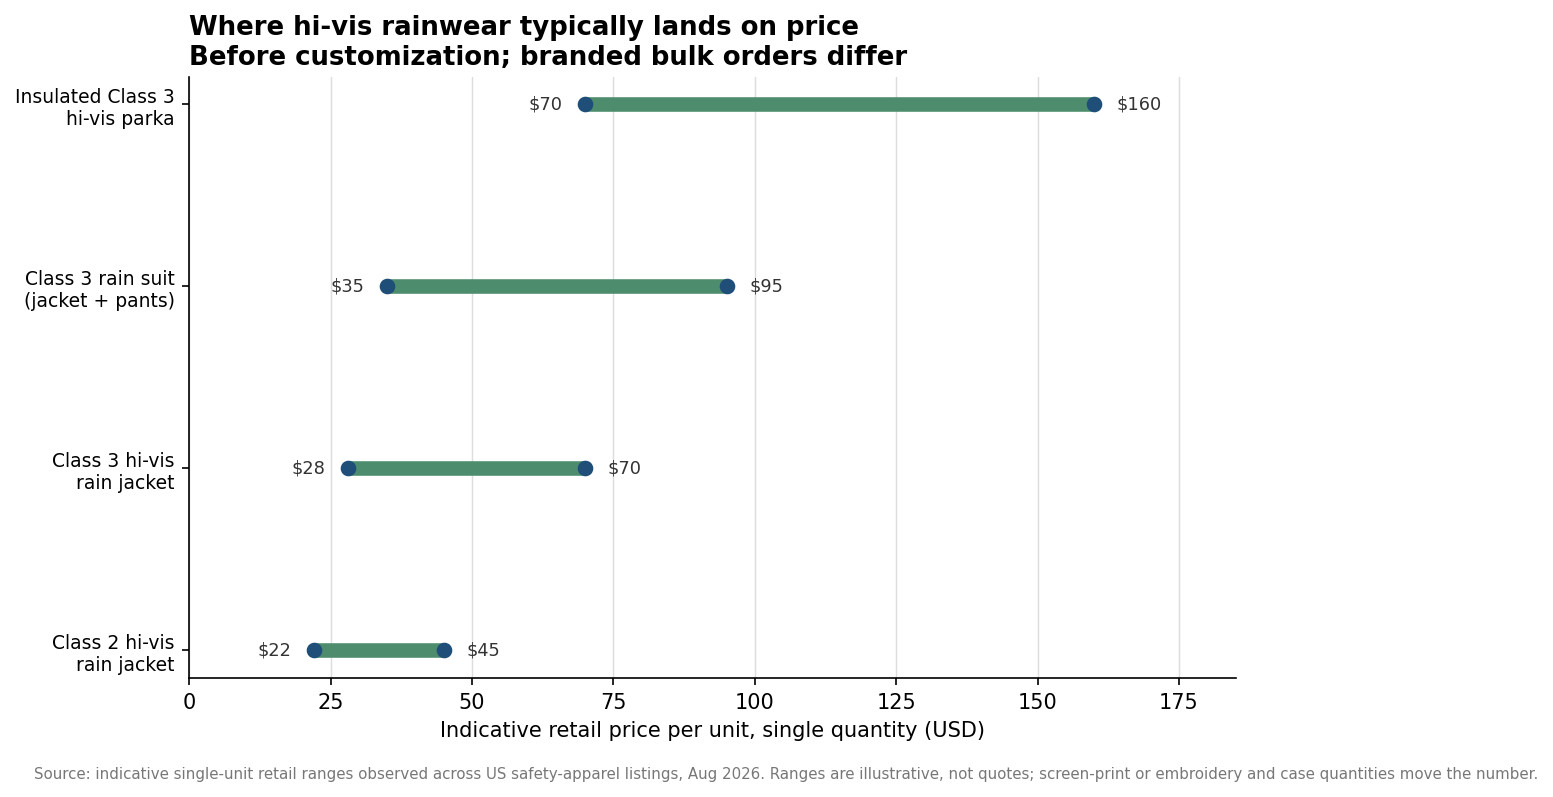
Indicative single-unit retail pricing gives you a sense of the bands before customization enters the picture. A Class 2 hi-vis rain jacket commonly lands in the low tens of dollars, a Class 3 jacket runs higher because it carries more certified material, a two-piece Class 3 rain suit costs more again, and an insulated Class 3 parka sits at the top. The chart below shows those ranges; treat them as illustrative rather than quotes, because case quantity, decoration method and fabric weight all move the final number.
To spec an order that actually passes, name the Type and Class up front — “Type R, Class 3” — rather than asking for “hi-vis rainwear” and hoping. Ask for the certificate of conformity or test report for the finished garment, not just the fabric. Confirm the seams are taped or welded and the reflective is combined-performance tape heat-sealed to the shell. Reserve your logo placement so branding does not eat into the background or cross the reflective bands, and choose your fluorescent color — yellow-green reads best in most daylight, orange-red often wins against green foliage or equipment. Finally, size up when in doubt: coverage is measured on the garment a worker is actually wearing, and a jacket that just squeaks past Class 3 on a small can slip under it once you scale the pattern down. Spend the extra minutes at the specification stage and the jacket will keep both the rain and the auditor off your crew.